|
 |
|
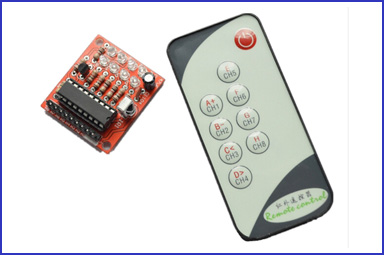
 IR리모콘 & 수신모듈 [8CH] IR리모콘 & 수신모듈 [8CH] |
-> 리모트콘트롤용 송신기와 수신 모듈
1. 8-WAY JOG, 9 KEY CONTROL
2. DC 3~5V
3. Distance : 3 ~ 8m |
|
|
|
Non professionals please don't buy this relay module, because we have no English instructions for the product. You have to understand the picture of description.
Packing List
1 X Receiver module
1 X 9-key IR remote (with a button battery)
Product Introduction:
1 This module receive by single-chip Microcomputer code, if key value code is different as our remote control code, receiver module will not be controlled.
2 Receiver module dimension: L3.8*W3.4cm with 2 fixed holes
3 Power voltage range: 3-5V
4 Receiver distance: 3-8 meters
5 Working Mode: inching(jog) control
How the remote work?
Connect output: PIN1( Power positive) PIN2(Power negative) H1,H2,H3,H4,H5,H6,H7,H8 represents 4output.
Indicate lights: H1, H2, H3, H4, H5, H6, H7, H8 lighten diode separately represent H1, H2, H3, H4, H5, H6, H7, H8 4 output.( The panel have not mark positive and negative, please connect the cable as the our description. Thank you!)
9Key remote control operate as below
1) Receiver module default is VOL, press on/off switch(power switch), receiver module H1, H2, H3, H4, H5, H6, H7, H8 send VOH at same time, also H1, H2, H3, H4, H5, H6, H7, H8 LED lights on. Releasing power switch output be VOL, indicate lights off
2) Press CH1, H1 become VOH and indicate led H1 on, releasing the key output change to VOL, light off.
3) Press CH2, H2 become VOH and indicate led H2 on, releasing the key output change to VOL, light off.
4) Press CH3, H3 become VOH and indicate led H3 on, releasing the key output change to VOL, light off.
5) Press CH4, H4 become VOH and indicate led H4 on, releasing the key output change to VOL, light off.
6) Press CH5, H5 become VOH and indicate led H5 on, releasing the key output change to VOL, light off.
7) Press CH6, H6 become VOH and indicate led H6 on, releasing the key output change to VOL, light off.
8) Press CH7, H7 become VOH and indicate led H7 on, releasing the key output change to VOL, light off.
9) Press CH8, H8 become VOH and indicate led H8 on, releasing the key output change to VOL, light off.
|
|
|
|
|
|
유틸전자주식회사 | 서울시 용산구 청파로74 전자랜드본관 광장층 C-31호 | E-mail: aprogara@naver.com| 사업자번호: 106-86-72446
Tel:050-5500-4900 Hosting Server www.nexgeo.co.kr|개인정보책임자:김영현 | 통신판매업 용산00261호 
 |
|
|
|
|
|
|
|
|